数字验证码识别
昨天整理了一下校园网的密码, 由于数据库是一年前的了, 所以有些密码不能用, 为了检验那些密码是好的, 那些是坏的, 就得去自助服务那里登陆一下才能知道. 但是登陆的时候有个问题, 验证码.
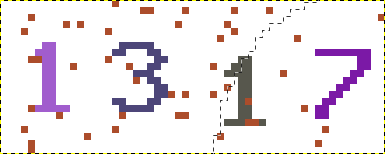
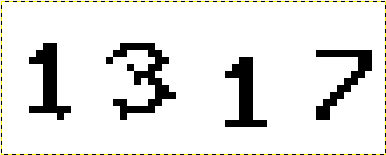
不过学校的验证码很low, 是下面这种的:


很容易识别, 于是就研究了一下怎样用Python识别图片中的数字.
用到的Python库
进行图像处理需要用到两个特殊的库, 第一个是PIL包下的Image模块, 第二个是进行OCR识别的pytesseract模块.
from PIL import Image # 图片处理, 打开, 关闭, 获取像素信息
from pytesseract import * # OCR识别的库, 对应的CLI命令行为 tesseract
二值化
我们可以看到上面的验证码颜色都比较鲜艳, 虽然看起来好看, 但是对于程序来说这是没有必要且多余的, 因为程序只需要知道某个点是黑的还是白的就好. 所以首先要做的是将图片变成黑白的.
要将一幅鲜艳的图片转换成黑白的, 还需要一点前戏, 图片灰度. 顾名思义, 就是把那些颜色都去掉, 变成灰色. 而二值化则是将灰色的点变成黑色.
实现二值化
灰度处理
先把上面的那张1317放大看一下:
(手动忽略那条截图时留下的细线)
img = Image.open('1317.png') # 打开图片
img = img.convert('L') # 转换成灰度图片
img.save('1317-L.png') # 保存图片
查看转换的结果:
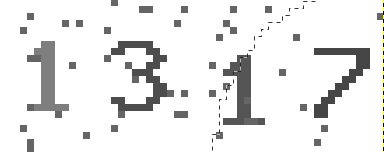
可以看到, 那些色彩都没了, 变成了灰色的图片.
二值化处理
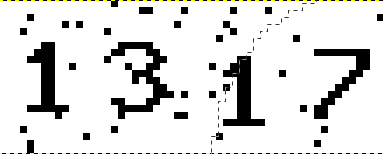
接下来就是将灰色变成黑色, 也就是二值化, 不是0就是255. 0代表黑色(没有数据), 255代表白色. 0-255颜色递减.
def threshold(img):
    w, h = img.size
    for x in range(w):
        for y in range(h):
            if img.getpixel((x, y)) < 255: #将灰色的变成黑色
                img.putpixel((x, y), 0)

def threshold_v2(img):
    """ 二值化 - 采用阈值分割法,threshold为分割点 """
    threshold = 140
    table = []
    for i in range(256):
        if i < threshold:
            table.append(0)
        else:
            table.append(1)
    img = img.point(table, '1')
通过上面的函数(两种实现方法)就可以得到下面这张图:
去除干扰点
去除干扰点的方法有很多, 比如有篇文章提到过的九宫格的方法:
用这种方法可以把那些孤立的像素点去除掉, 但是对那些两个相连的点就无能为力了, 比如上图右上角的那个大的干扰点.
这样就很尴尬, 因为只把孤立的干扰点除去了是不够的.
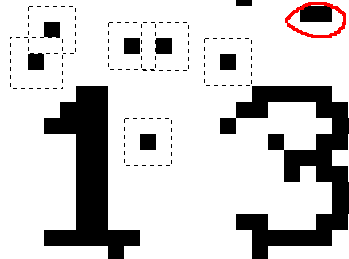
所以我就想到, 可以利用判断相邻点的面积来判断某块儿区域是不是干扰点. 因为数字或字母总是连续的, 只有干扰点才是相对孤立的. 这里相对孤立的意思是, 它们所连结起来组成的面积, 是不可能有一个完整的数字那么大的, 而且即使他们与某个数字的部分相连结, 所造成的影响也不是很大, 比如和1, 3 相连的那几个点是不影响识别的:
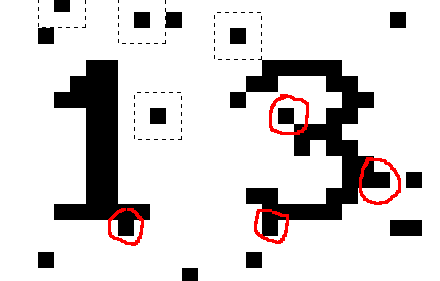
所以, 可以先扫描一下所有的有色点(黑点), 然后判断这些点是否连接, 并计算这些连结区域的面积. 如果连接起来的面积小于某个阀值, 则说明它是一个(块)干扰点(区),则可以将其删除.
代码实现:
下面的代码是验证码识别的完整类代码, 其中关于选择干扰点和计算干扰面积的函数有 find,merge,scanPixel和calarea.
class captcha:
    """验证码识别"""
    def __init__(self, image):
        self.imgname = image
        self.img = Image.open(image)
        self.size = self.img.size
        self.w, self.h = self.size
        maxn = self.size[0] * self.size[1]
        self.dotMap = []
        self.root = [i for i in range(maxn)]
        self.count = [1 for i in range(maxn)]
        self.dx = [1, -1, 0,  0, 1, -1, 1, -1]
        self.dy = [0,  0, 1, -1, 1, -1, -1, 1]
        self.vis = [False for i in range(maxn)]
        self.tmp = []

    def find(self, x):
        """ 查找某个点的root """
        if self.root[x] != x:
            self.root[x] = self.find(self.root[x])
            return self.root[x]
        else:
            return self.root[x]

    def merge(self, x, y):
        """合并root相同的区域"""
        x = self.find(x)
        y = self.find(y)
        if (x == y):
            return
        else:
            self.root[x] = y
            self.count[y] += self.count[x]
    def scanPixel(self):
        """ 扫描点 """
        for x in range(self.w):
            for y in range(self.h):
                if self.img.getpixel((x, y)) == 0:
                    self.dotMap.append((x, y))
                    for i in range(8):
                        sx = self.dx[i] + x
                        sy = self.dy[i] + y
                        if sx < 0 or sy < 0 or sx >= self.w or sy >= self.h:
                            continue
                        if self.img.getpixel((sx, sy)) == 0:
                            self.merge(x*self.h+y, sx*self.h+sy)
    def closeImg(self):
        self.img.close()

    def saveImg(self, name):
        self.img.save(name+"-"+self.imgname)

    def threshold(self):
        """ 二值化 - 采用阈值分割法,threshold为分割点 """
        threshold = 140
        table = []
        for i in range(256):
            if i < threshold:
                table.append(0)
            else:
                table.append(1)
        self.img = self.img.point(table, '1')

    def gray(self):
        """ convert the image to gray """
        self.img = self.img.convert('L')

    def calarea(self, x, y):
        self.vis[self.find(x*self.h + y)] = True
        return self.count[self.find(x*self.h + y)]

    def clear(self):
        for dot in self.dotMap:
            if self.calarea(dot[0], dot[1]) < 15:
                self.img.putpixel(dot, 1)

    def text2String(self):
        """ 识别转换 """
        rep = {'O': '0', 'A' : '8',
               'I': '1', 'L': '1',
               'Z': '2', 'S': '8',
               'E': '6', 'G': '9',
               'B': '6', ' ': ''
               }
        self.text = image_to_string(self.img, config="-l chi_sim")
        self.text = self.text.upper()
        for r in rep:
            self.text = self.text.replace(r, rep[r])
        if not self.text.isalnum():
            self.text = image_to_string(self.img, config="-l eng")
        for r in rep:
            self.text = self.text.replace(r, rep[r])

    def captcha(self):
        self.gray()
        self.threshold()
        self.scanPixel()
        self.clear()
        self.text2String()
单独处理干扰点所得到的图像为:
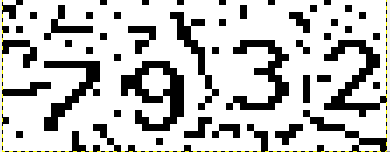
为了使效果更明显, 我准备了这样一张图:

放大之后:
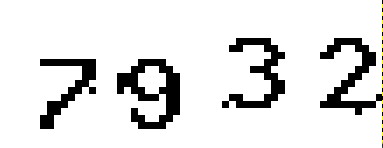
然后经过去点处理:

放大:
命令行识别对比:

已经能够完美的识别了其中的数字.
OCR识别
这里用到的是pytesseract的库里面的image_to_string()函数.
为了更精确的识别验证码, 可以在函数中加一点参数, 我这里的做法是先设置语言为中文, 加了 config="-l chi_sim", 然后如果其中有非数字的话, 再进行英文识别, 使用的参数为 config="-l eng", 其中添加了错误转换, 将某些易错的英文转换成数字.
这样一来, 识别的正确率能达到98%.(后讲)
    def text2Strings(self):
        """ 识别转换 """
        rep = {'O': '0', 'A' : '8',
               'I': '1', 'L': '1',
               'Z': '2', 'S': '8',
               'E': '6', 'G': '9',
               'B': '6', ' ': ''
               }
        self.text = image_to_string(self.img, config="-l chi_sim")
        self.text = self.text.upper()
        for r in rep:
            self.text = self.text.replace(r, rep[r])
        if not self.text.isalnum():
            self.text = image_to_string(self.img, config="-l eng")
        for r in rep:
            self.text = self.text.replace(r, rep[r])
多线程处理
参照这篇文章的做法, 进行了并行处理, 加快了处理的速度, 一百张图进行识别用了35.8秒.
from multiprocessing import Pool
total = len(pics)
wrong = 0.0

def main(pic):
    try:
        i = captcha(pic)
        i.captcha()
        tname = i.imgname.replace(".png","")
        oname = i.text
        if tname !=  oname:
            i.saveImg(oname)
        return tname+'.png' , oname
    except Exception, e:
        print e

pool = Pool()
results = pool.map(main, pics) #其中pics是由图片名组成的列表
pool.close()
pool.join()

for re in results:
    if re[1] != re[0].replace('.png', ''):
        print re[0],re[1]
        wrong += 1

print '识别正确率 :%.1f' % ((total - wrong)/total*100) + ' %'
结果验证
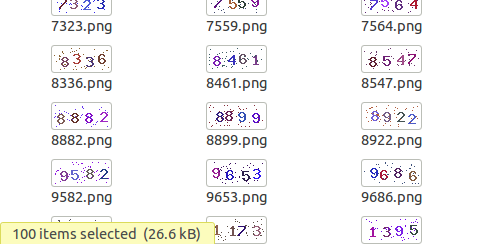
我从登陆页面爬了100张验证码, 并根据验证码的数字更改了图片的名字:
运行之后:

最后
还有很多可以优化的地方, 比如验证码分解, 把验证码分开, 然后根据像素点匹配数字或字母, 还需要去除那些干扰线, 需要用到数学的一些知识.
不过现在已经能够满足我的要求了, 下一步就是集成到自动登陆里面, 那就是下一篇文章将要研究的了.
完整代码和验证码图片在github: https://github.com/wrfly/captcha_verify